Creating Nested Containers: The Raw Way
Search for a command to run...
No comments yet. Be the first to comment.
Security dashboards are lying to you. That critical CVE flagged in your dependency scan? Odds are, your application never touches the vulnerable code path. The result is alert fatigue, wasted engineer

Harbor is an enterprise-class private container registry with advanced features like RBAC, replication, vulnerability scanning, and more. In this guide, we'll set up Harbor on a Ubuntu machine, secure it with Let's Encrypt certificates, and use Cloud...
Introduction This document provides a step-by-step guide to installing and configuring the AWS CLI and Pulumi on Ubuntu 24.04. Prerequisites Ubuntu 24.04 installed and configured. A user account with sudo privileges. An active AWS account. 1. In...

Introduction This document outlines the procedures for creating AWS Access Keys for both IAM users and IAM Identity Center (Federated) Users. These credentials are used for programmatic access to AWS services, enabling applications and tools to inter...

While reading the book Container Security, a strange question popped into my head. Since everything inside a container is essentially a process running on the host machine's Linux kernel, what about creating nested containers? From the kernel's perspective, it would be yet another isolated process, right?
I tried running a container inside another container using Docker, but it didn't work. I then discovered that Docker uses a client-server architecture, and everything is managed by a central root process called the Docker daemon.
Later, I found something called Docker in Docker, or DIND for short. It's a special Docker image designed to run Docker inside a DIND Docker container. Cool, right?
This inspired me to explore whether I could create three levels of nested containers using Namespaces, Control Groups, and by directly modifying the file system. It was an amazing learning experience about containers! In this article, I’m sharing how you can do the same, along with the insights I gained.
sudo, it runs on the host machine. When a command is given without sudo, it runs inside container.To conduct the experiment, I'm using AWS EC2, but you can also use a virtual machine. The main requirements are a Linux kernel and a stable internet connection.
So, as usual, before installing any package on Linux, update the package list.
sudo apt update
To set up a minimal Debian-based file system with correct permissions, use the debootstrap tool. This utility creates a basic Debian or Ubuntu filesystem by downloading and extracting only the necessary packages.
sudo apt install debootstrap
Once you have debootstrap installed, the next step is to create a directory where the minimal filesystem will be built. You can name the directory anything you like. In this example, we'll create a directory called ubuntufs:
mkdir ubuntufs
Now, use the debootstrap command to create a minimal Ubuntu filesystem. Here, jammy refers to the codename for Ubuntu 22.04 LTS, and ubuntufs is the directory where the filesystem will be set up.
sudo debootstrap jammy ubuntufs
You might need to wait for some minutes to download and unpack the file system by running this command.
Now let’s switch to root user.
sudo su
As we create nested containers, we'll reuse this ubuntufs file system three times. So, we'll copy this directory as shown below.
/home/ubuntu
      └──── /ubuntufs/root
                      └── /lubuntufs/root
                                     └── /llubuntufs
Note that we are using the -a flag in the cp command. Why -a and not -r? Because the -a flag preserves the permissions of all files while copying.
cp -a ubuntufs/ lubuntufs/
mv lubuntufs/ ubuntufs/root/
cd ubuntufs/root/
cp -a lubuntufs/ llubuntufs/
mv llubuntufs/ lubuntufs/root/
exit
Now, to work with cgroups, we will use the cgcreate, cgset, and cgexec commands. To do this, we need to install the cgroup-tools package.
sudo apt install cgroup-tools -y
To create a new cgroup, we are using cgcreate command. Let’s create a cgroup named container1 with the memory, pids, and cpu controllers. These controllers help to restrict memory usage, process IDs, and CPU usage for processes attach within this cgroup.
sudo cgcreate -g memory,pids,cpu:container1
This command sets up the specified controller for container1, enabling resource restrictions for any processes you later assign to it.
Now that the container1 cgroup is created with specified controllers, you can set specific resource limits for memory, process IDs (pids), and CPU usage. Here's how I’m configuring them:
Set the memory limit: All the process in container1 can’t allocate more than 256MB of memory.
Set the process limit: At most 10 processes can be created under container1.
Set CPU weight: This command adjusts the CPU scheduling priority for container1. A higher value means more CPU time for the cgroup. Here, it's set to default value 100.
sudo cgset -r memory.max=256M container1
sudo cgset -r pids.max=10 container1
sudo cgset -r cpu.weight=100 container1
There are more cgroup controllers. Just for learning purpose we are using main three. To know more read the documentation.
(You can ignore this portion of the article if you want.)
Create container1 directory under /sys/fs/cgroup/ path.
sudo mkdir -p /sys/fs/cgroup/container1
Inside the container1 directory, you will notice that necessary folders are automatically created by the kernel.
Now, to enable the memory, pids, and cpu controllers for the container1 cgroup, you need to configure the cgroup.controllers file.
echo "+memory +pids +cpu" | sudo tee /sys/fs/cgroup/container1/cgroup.controllers
These controllers are now active and will manage resources for any processes assigned to this cgroup.
Now, let's assign specific values to the memory.max, pids.max, and cpu.weight files to set the limits for each controller.
sudo sh -c "echo 512M > /sys/fs/cgroup/container1/memory.max"
sudo sh -c "echo 20 > /sys/fs/cgroup/container1/pids.max"
sudo sh -c "echo 100 > /sys/fs/cgroup/container1/cpu.weight"
Finally, we will create our first container by running the following command.
sudo cgexec -g memory,pids,cpu:container1 \
unshare --mount --uts --ipc --pid --fork --net \
chroot ubuntufs /bin/bash -c "hostname mycontainer-1 && bash"
This command runs a new process inside a controlled environment with limited resources and isolation.
First, cgexec -g memory,pids,cpu:container1 attach the new process with container1 cgroup.
Then, unshare --mount --uts --ipc --pid --fork --net creates an isolated space for the process, separating its file system, hostname, inter-process communication, process IDs, and network from the main system.
Finally, chroot ubuntufs /bin/bash -c "hostname mycontainer-1 && bash" changes the root directory to ubuntufs, sets the hostname to mycontainer-1, and starts a Bash shell.
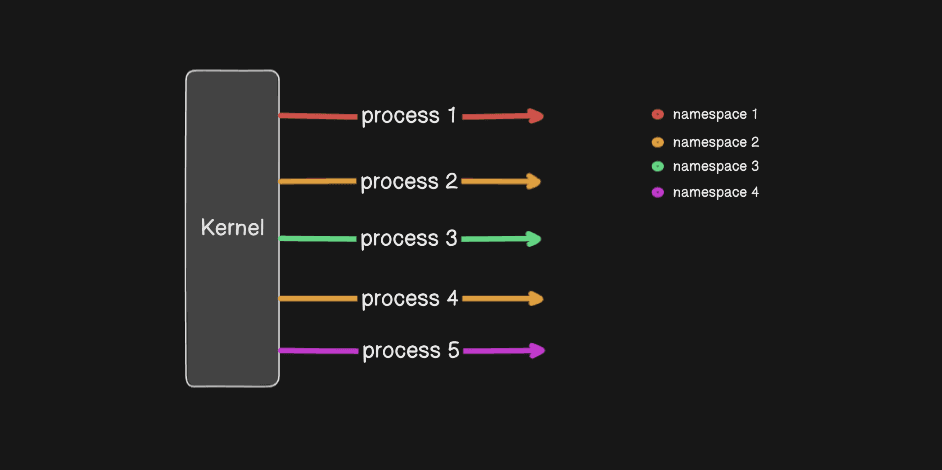
The following screenshot shows how new processes are created for the container:

Basically, the container process is a new fork of the previous process in the main system. Everything executed inside that container will be a fork of that process. We will explore this further in the later part of this article.
Till now, Linux kernel supports 8 different namespaces. These are:
Mount Namespace
Isolates the file system mountpoint
UTS Namespace
Isolates hostname and domain name. Allows processes to have their own hostname and NIS domain name.
IPC Namespace
Isolates inter-process communication (IPC) resources, such as message queues, shared memory, and semaphores. Prevents processes in different IPC namespaces from interacting.
PID Namespace
Isolates process IDs. Processes in a PID namespace have their own independent set of process IDs, and they cannot see or interact with processes outside their namespace.
Network Namespace
Isolates network interfaces, IP addresses, routing tables, and port numbers. Each network namespace has its own virtual network stack.
User Namespace
Isolates user and group IDs. Allows a process to have root privileges inside the namespace while being a non-root user outside the namespace, enhancing security. (rootless container)
Cgroup Namespace
Isolates the view of control groups (cgroups). Processes in a cgroup namespace see only the part of the cgroup hierarchy that they are in.
Time Namespace
Isolates the system clock. Allows processes to have their own view of the system time, which is useful for containers that need to adjust their clocks independently of the host.
In this article, we will not use the last three namespaces as they are relatively new and not all of them support or enabled in a docker container by default.
Though you are inside container, you can’t create any process. For that you need to mount the /proc pseudo-filesystem.
mount -t proc proc /proc
This will make the /proc directory available inside the chroot, allowing processes within the container to access vital system information like process IDs, memory stats, and other resources that are normally found in /proc on the host system.
To verify which control groups the current shell (or process) is associated with, you can inspect the /proc/$$/cgroup file. The $$ is a shell variable that represents the process ID of the current shell session. By reading this file, you can see the cgroups and that your process is assigned to.
Run the following command:
cat /proc/$$/cgroup
This command will output the cgroup your current process belongs to.

From the image above, you can see that the container's network stack is isolated and only has a loopback interface. Therefore, we need to configure it further for network connectivity.
To create a virtual network bridge, you can use the ip command. A bridge allows multiple network interfaces to communicate as if they were on the same physical network, making it useful for connecting virtual machines or containers.
Run the following command on the host machine to create a bridge named v-net-br:
sudo ip link add v-net-br type bridge
To view all active network namespaces on your system, you can use the lsns command with the -t net option. This provides detailed information about network namespaces, including the associated PIDs
sudo lsns -t net

To create a virtual Ethernet (veth) pair and assign one end to a specific network namespace, use the following command. Here, ve1 and ve2 are the names of the veth interfaces, and 16700 is the PID of the target network namespace:
sudo ip link add ve1 netns 16700 type veth peer name ve2
ip link add: Creates a new network link.
ve1 netns 16700: Assigns one end of the veth pair (ve1) to the network namespace with PID 16700.
type veth: Specifies the creation of a virtual Ethernet pair.
peer name ve2: Names the other end of the veth pair as ve2, which remains in the root namespace.
This setup creates a virtual connection between the two namespaces, allowing them to communicate as if they were connected by a physical link.
To connect one end of a virtual Ethernet (veth) pair to a bridge, you can use the following command. Here, ve2 is the veth interface in the default network namespace, and v-net-br is the bridge created earlier:
sudo ip link set ve2 master v-net-br
ip link set: Modifies the properties of a network interface.
ve2: The veth interface you want to attach to the bridge.
master v-net-br: Specifies that ve2 should become a member of the bridge v-net-br.
This effectively connects ve2 to the bridge, allowing it to communicate with other devices attached to the same bridge.
To assign an IP address to the ve1 interface in the target network namespace, use the following command:
ip addr add 10.0.0.2/24 dev ve1
ip addr add: Adds an IP address to a network interface.
10.0.0.2/24: Specifies the IP address (10.0.0.2) and subnet mask (/24, equivalent to 255.255.255.0).
dev ve1: Indicates the network interface (ve1) to which the IP address should be assigned.
This command automatically adds a route to the routing table unless specified otherwise.
To assign an IP address to the bridge interface v-net-br, use the following command:
sudo ip addr add 10.0.0.5/24 dev v-net-br
This step allows the bridge to act as a gateway or communicate directly within the 10.0.0.0/24 subnet, making it a central point for routing traffic between connected interfaces.
To assign an IP address to the ve2 interface in the default namespace without modifying the routing table, use the following command:
sudo ip addr add 10.0.0.3/24 dev ve2 noprefixroute
Here, noprefixroute prevents the automatic addition of a route for the specified IP address to the routing table.
This allows ve2 to communicate within the 10.0.0.0/24 subnet without interfering with the system's global routing table.


To bring the ve1, ve2, v-net-br interface up and make it active, use the following command:
ip link set ve1 up
sudo ip link set ve2 up
sudo ip link set v-net-br up
To set a default gateway for the network interface inside container, use the following command:
ip route add default via 10.0.0.5
ip route add: Adds a new route to the system’s routing table.
default: Specifies the default route, which is used when no other route matches the destination.
via 10.0.0.5: Sets 10.0.0.5 as the gateway (next-hop) for the default route.
This command ensures that any traffic destined for an unknown network will be forwarded to the IP address 10.0.0.5, which is the bridge IP that is working as gateway.

To enable NATting for the 10.0.0.0/24 subnet, use the following iptables command. This command allows traffic from the subnet to be masqueraded with the IP address of the internet facing interface’s private IP address.
sudo iptables -t nat -A POSTROUTING -s 10.0.0.0/24 -j MASQUERADE
iptables -t nat: Specifies the NAT table.
-A POSTROUTING: Appends a rule to the POSTROUTING chain, which handles traffic leaving the system.
-s 10.0.0.0/24: Defines the source network (10.0.0.0/24), specifying the traffic that should be subject to NAT.
-j MASQUERADE: Uses the MASQUERADE target, which dynamically replaces the source IP address of outgoing packets with the IP address of the outgoing network interface.

To enable IP forwarding on host system, which is necessary for routing traffic between different network interfaces, use the following command:
sudo sysctl -w net.ipv4.ip_forward=1
sysctl -w: Modifies a kernel parameter at runtime.
net.ipv4.ip_forward=1: Enables IP forwarding for IPv4, allowing the system to forward packets between different network interfaces.
This command is essential when setting up network routing or working with NAT, as it ensures the system can route traffic between networks or namespaces. To make the change persistent across reboots, you can add net.ipv4.ip_forward=1 to /etc/sysctl.conf and run sysctl -p to apply the settings.
To change the DNS nameserver in container to 9.9.9.9, use the following command:
sed -i 's/nameserver .*/nameserver 9.9.9.9/' /etc/resolv.conf
This command will update the DNS resolver to use 9.9.9.9. This change allows your system to resolve domain names using Quad9’s DNS service.
To mount the devpts filesystem, which is used for managing pseudo-terminals, use the following command:
mount -t devpts devpts /dev/pts
mount -t devpts: Specifies that the filesystem type to mount is devpts, which is responsible for providing pseudo-terminals.
devpts: The source of the filesystem (in this case, the devpts virtual filesystem).
/dev/pts: The target directory where the devpts filesystem will be mounted, typically used for controlling terminal sessions.
This command enables the use of terminal devices, which are essential for processes that require interactive shell access, such as when running commands inside containers or chroot environments.
To enable additional software repositories and install the required tools for managing cgroups, use the following commands:
This installs the software-properties-common package, which provides tools for managing repositories and adding PPAs.
This command adds the universe repository, which contains open-source software packages that are not officially supported but are still available for installation.
Finally, this installs the cgroup-tools package, which provides utilities for managing control groups (cgroups) on Linux systems.
These steps set up the system for working with cgroups, which are essential for resource management and isolation in containerized environments.
apt install software-properties-common
add-apt-repository universe
apt install cgroup-tools -y
Running the previous command resulted in this error in my case: the public key is not available: NO_PUBKEY 871920D1991BC93C. To fix this, I added the keyring using the following command:
apt install wget -y
mkdir -p /etc/apt/keyrings
wget -qO /etc/apt/keyrings/ubuntu-archive-keyring.gpg https://keyserver.ubuntu.com/pks/lookup?op=get&search=0x871920D1991BC93C
apt update
To set up the cgroup filesystem and mount it for use, you can run the following commands:
This creates the /sys/fs/cgroup directory if it doesn't already exist. It's the mount point where the cgroup filesystem will be accessed.
mkdir -p /sys/fs/cgroup
mount -t cgroup2 none /sys/fs/cgroup
This command mounts the cgroup version 2 filesystem at /sys/fs/cgroup. The none option indicates that there is no device associated with the mount, and the -t cgroup2 specifies that the mount should be of type cgroup2.
Now we can use cgcreate command like before to create container2 cgroup.
cgcreate -g memory,pids,cpu:container2
cgset -r memory.max=256M container2
cgset -r pids.max=10 container2
cgset -r cpu.weight=100 container2
Now let’s move to root directory inside the container.
cd ~
Now let’s run the following command to create another container inside a container.
cgexec -g memory,pids,cpu:container2 \
unshare --mount --propagation private --uts --ipc --pid --fork --net \
chroot lubuntufs /bin/bash -c "hostname mycontainer-2 && bash"
And here you go. Container inside container.
If we see this from host system, the process looks like the following.

Note that this command is similar to the one we used to create mycontainer-1. However, we are not using the --mount flag for the mount namespace. Why did we do this? Honestly, I don't have a clear idea. I set the propagation type to private on the host machine, but it didn't work. The only time it works is when I'm not using the --mount flag. We will discuss the consequences of not using the mount namespace later in this article.

Now, we will follow similar steps to set up our third container inside the second container. Instead of explaining all the commands again, I'll simply list them below.
mount -t proc proc /proc
sudo lsns -t net

sudo ip link add ve3 netns 19210 type veth peer name ve4
sudo ip link set ve4 master v-net-br
ip link set ve3 up
sudo ip link set ve4 up
ip addr add 10.0.0.20/24 dev ve3

sudo ip addr add 10.0.0.30/24 dev ve4 noprefixroute

ip route add default via 10.0.0.5

sed -i 's/nameserver .*/nameserver 9.9.9.9/' /etc/resolv.conf
mount -t devpts devpts /dev/pts
apt install software-properties-common
add-apt-repository universe
apt install cgroup-tools -y
mkdir -p /sys/fs/cgroup
mount -t cgroup2 none /sys/fs/cgroup
cgcreate -g memory,pids,cpu:container3
cgset -r memory.max=256M container3
cgset -r pids.max=10 container3
cgset -r cpu.weight=100 container3
cd ~
Now we are creating our third container inside second container.
cgexec -g memory,pids,cpu:container3 \
unshare --uts --ipc --pid --fork --net \
chroot llubuntufs /bin/bash -c "hostname mycontainer-3 && bash"
This is the process view from the host machine.

Finally, if we want to view the route table of our host machine, it looks like this:

Although we have only configured the second entry, the others are initially set up by AWS.
As mentioned earlier, I couldn't create a separate mount namespace in mycontainer-2 and mycontainer-3. As a result, the mount path of mycontainer-3 is accessible from mycontainer-2 and mycontainer-1, but not from the host machine. We can see a similar situation in mycontainer-2.


If you enjoyed this article, you might also like my article on OverlayFS, how it works, and how Docker uses it. Until my next article, As-salamu Alaykum.